

I learnt how to bake this beginners easy bread recipe using instant yeast at a baking school in Singapore back in 2016. As one may have noticed the whole world right now, including me, is baking all kinds of bread in isolation. Some are calling bread baking therapeutic while others are doing it to kill time. Most of all, individuals are doing it out of necessity when visits to grocery stores are limited. After all everyone is trying to do their part in flattening the Covid-19 curve. Further bread is one of the most basic necessities in life. I do believe this pandemic has forced us to rethink our way of living and go back to the simple pleasures in life.
So I dug out the notes from my bread baking class to recreate a simple loaf of sandwich bread at home. This recipe is for the novice, someone with no experience baking bread at home. This beginners easy bread recipe using instant yeast requires no dutch oven or stand mixer. You don’t need to invest in a fancy bread maker or add in new gadgets to your kitchen. Further the basic bread recipe uses no eggs or butter. Just the simple ingredients that are flour, salt, water and yeast. And of course an oven to bake the bread loaf in.
Baking Notes for Easy Bread Recipe
- Preparation for Easy Bread Recipe with Instant Yeast
- How to store the bread?
- Serving suggestions with Bread loaf
- On flours, yeast and baking bread
Preparation for Easy Bread Recipe with Instant Yeast
As I mentioned above, making this loaf of bread requires minimal ingredients. You will need to buy a good quality bread flour though. Hopefully you all have access to it where you live. (Do read my note below on flours and their differences.) I know we are very fortunate here in Australia as I see all grocery stores are adequately stocked with all kinds of baking flours. They have imposed some restrictions on the quantity of flour one can purchase at any given time. That in my opinion is not a problem as it stops us hoarding supplies and lets us be mindful of our purchases.
You will require some planning around when you want to bake the bread. The night before (or atleast 12-16 hours before baking) you will have to ferment about 100 grams of dough to add into the bread flour the following day. Hopefully in the stay-at-home environment, you are able to fit this into your schedule.
Few points to note as follows
- Wheat comprise carbohydrates, gluten, sugar and protein in varying ratios that helps create the mass in bread
- I use the Tap the dough technique i.e. tap the dough on the surface, pull the stretchy dough towards you and then fold back . Following these 3 steps knead the dough for 15 min and then let it rest for 1-2 minutes. This allows the oxygen to enter the dough while folding.
- Be gentle with the dough. Softly tip it and touch it.
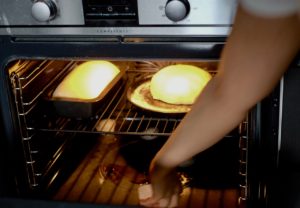
- I tried to create steam in the home oven using ice cubes.


How to store the bread?
Store this bread at room temperature covered with a tea towel or wrapped in brown paper on the kitchen counter. One can also freeze this sandwich loaf. When you want to eat it, just defrost and then toast.
Serving suggestions with Bread loaf
Breakfast with bread : The best way (in my opinion) to enjoy any fresh-out-of-the-oven bread is to toast the slices and slather them in lightly salted butter. That may be a bit much of a carb-fat load for some. In that case you can slice avocados and top with sea salt and cut cherry tomatoes. I also serve warm toast with different nut butters, fruit (fresh berries or banana slices are the best) and sprinkle some cinnamon powder on top.
Lunch with bread: Since this is a sandwich bread loaf, it is ideal for lunch time sandwiches. Shred some lettuce and slice in some cucumbers, tomatoes, beetroot to stuff it between 2 slices. I also like to add in sharp cheddar with any chutney and pickles on hand. For a hearty lunch adding in boiled eggs or grilled tofu is ideal.
Dinner with bread: In case I want to use this kind of sandwich bread for dinner, I normally use it to make cheese and mushroom toasties served with homemade vegetable pickles. I also like to dip in pieces of bread in olive oil and vinegar for a quick side or to nibble on while preparing dinner. Further I even make croutons or bread crumbs of any stale bread remaining to use in salads or as burger patty fillings.


On Flours, yeast and baking bread
On different flours : The numerous flours available can be confusing to the novice. Think bread flour vs wheat flour vs all purpose vs pastry/cake flour etc. I have done some research around these flours and here is the summary. Besides the fresh wheat berries that are essential to mill good quality flour, one key difference among these is the protein content (gluten). Whole wheat and spelt flours have a high protein (gluten) content about 13-14 percent, followed by bread flour, all purpose and then pastry or cake flour. A higher protein content in flours results in a dense baked good while a lower protein content creates a lighter fluffy baked item. The higher gluten when kneaded creates a firm and elastic structure to the bread dough. I found the following links relating to the different types of wheat flours and what exactly is gluten that you may want to read if interested in the science.
Instant Yeast vs Active Dry yeast : What I understand is that instant yeast can be added directly to the dry ingredients while active dry yeast gets activated when added to water. Check out this link that explains the difference between the two. Of course there is fresh yeast and the whole process of creating sourdough starters , but that is another story.
Different types of bread : There are so many styles of baking bread across countries based on so many ancient traditions. This list of breads on Wikipedia is by no means exhaustive but it was a fun way to look up the different styles of bread I have consumed till date 🙂 Few more links that I found interesting as follows
- On the history of bread here
- This link on the overview of quick breads
- Here is a link on bread leavening and sourdough starters
Please let me know in the comments if you have any questions or your thoughts. If you like this recipe, please do leave a rating below. Don’t forget to tag #urbanfoodlover and follow along on Instagram 🙂

Beginners Easy Bread Recipe using Instant Yeast
Equipment
- oven
- Mixing bowls
- Dough scrapers
Ingredients
The Day before – Fermented Dough to add in the main ingredients
- 60 grams Bread Flour
- 1 pinch salt
- 1/4 tsp Instant dried yeast
- 40 ml water
The Day of Baking the Bread
- 500 grams Bread flour Additional flour for dusting
- 100 grams fermented dough from the day before
- 10 grams salt
- 10 grams sugar
- 5 grams Instant dried yeast
- 10 grams olive oil
- 350-380 ml water Approx.
Instructions
The Day before – Fermented Dough to add in the main ingredients
- In a mixing bowl, place all the ingredients. Add in the water and mix to form a dough ball.
- Place on a counter top and knead until the dough turns stiff and seems developed.
- Place the ball of dough in a lightly oiled container, cover with cling wrap and leave overnight. (Atleast 12-16 hours)
The Day of Baking the Bread
- Pre-heat oven to 250 deg centigrade.
- Place all the ingredients in a large mixing bowl. Using a spoon combine all ingredients. The dough will be wet and a wet mess.
- Gently tip it onto a floured counter top and knead for 10-15 minutes( knead 2-3 minutes and rest 1 minute). Be gentle with the dough. Use the tap-pull-fold method of kneading i.e. using one hand tap the dough on the surface, pull one end towards yourself and then fold in the opposite direction.
- The dough will be very sticky initially, but as you continue kneading the gluten and structure will develop. After kneading for app. 15 min, once the dough is smooth and elastic in feel place it in a lightly oiled container and cover with cling wrap. Let it proof for 1 hour in a warm place (23-25 deg centigrade) until it doubles in bulk.
- After an hour , once the dough has doubled gently deflate the dough by folding it back onto itself. This will help the dough develop more strength. Cover again with a cling wrap and proof for another 30 minutes.
- After 30 minutes, tip the dough on a lightly floured surface and using a dough scraper cut the dough into 2 equal pieces.
- Start shaping the 2 dough pieces. I shaped one into an oblong shape and placed it into a loaf tin. For the second piece, I shaped it oval like a boule bread and placed it on a cast iron pan. Cover both loaves with a kitchen towel and let sit in a warm place for 15 minutes

- In a pre-heated oven place both the loaves of bread at 250 deg centigrade for app. 20-25 minutes. To apply steam in a home oven (steam is required to form a nice crusty bread), I throw ice cubes at the bottom of the oven and immediately shut the oven door.
- After app. 20 min, reduce the oven temperature to 200 deg centigrade and bake for another 6-8 minutes.
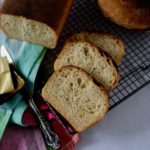
- Remove from the oven and cool on a wire rack before slicing. A good test to ensure the loaves are baked is to tap the bottom of the loaves – they should sound hollow when tapped.


